Adobe Workfront Fusion Professional Questions and Answers
Which module must a user select to upload a document into Workfront and attach it to a task?
Options:
Create Record for Document Version after Create Record for the document on the task
Upload Document while setting the related record
Create Record of Document type while setting the related record
Miscellaneous Action to attach document to a task
Answer:
BExplanation:
Understanding the Requirement:
The user wants to upload a document into Workfront and attach it to a specific task.
This action involves creating a document in Workfront and associating it with a task as a related record.
Why Option B is Correct:
TheUpload Documentmodule is specifically designed for uploading files into Workfront.
It includes the ability to set arelated record(e.g., a task, project, or issue) to which the document will be attached.
This ensures the document is uploaded and correctly linked to the task in a single operation.
Why the Other Options are Incorrect:
Option A ("Create Record for Document Version after Create Record for the document on the task"):
This involves multiple steps, which are unnecessary. TheUpload Documentmodule already handles both the upload and the attachment in one action.
Option C ("Create Record of Document type while setting the related record"):
TheCreate Recordmodule is not designed for file uploads. It only creates metadata records, not the actual document.
Option D ("Miscellaneous Action to attach document to a task"):
There is noMiscellaneous Actionspecifically for attaching a document to a task. TheUpload Documentmodule is the appropriate choice.
Steps to Upload a Document in Workfront Fusion:
Add theUpload Documentmodule to the scenario.
Specify the file to upload (e.g., from a previous module like Google Drive or an HTTP request).
Set therelated recordto the target task by providing its ID.
Run the scenario to upload and attach the document to the task.
References and Supporting Documentation:
Adobe Workfront Fusion: Upload Document Module
Workfront Community: Best Practices for Document Management in Fusion
The Upload Document module is the most efficient and accurate method for uploading and attaching a document to a task in Workfront.
What two module outputs does a user receive from this expression? (Choose two.)

Options:
Non-empty array
An empty field
Text value'No Type"
Collections comma separated
Answer:
A, CExplanation:
Understanding the Expression:
The provided expression uses the ifempty function:
ifempty(2.data:types[]; "No Type")
Structure of the Expression:
The first parameter, 2.data:types[], is an array being checked for content.
The second parameter, "No Type", is the fallback value returned if the array is empty or undefined.
Purpose of ifempty: This function checks if the given value is empty or undefined. If the value is not empty, it returns the value. If the value is empty, it returns the fallback text ("No Type").
Expected Module Outputs:
A. Non-empty array:
If 2.data:types[] is a non-empty array, the function returns the array as-is.
C. Text value 'No Type':
If 2.data:types[] is empty or undefined, the function returns the fallback text value "No Type".
Why the Other Options are Incorrect:
Option B ("An empty field"):
The ifempty function does not return an empty field. If the value is empty, it substitutes it with the fallback text ("No Type").
Option D ("Collections comma separated"):
The function operates on arrays, but it does not format the output as comma-separated collections. The raw array is returned if non-empty.
Key Use Cases:
This type of function is frequently used in Workfront Fusion to handle situations where data might be missing or incomplete, ensuring scenarios continue to run smoothly without errors caused by undefined or empty fields.
Example Outputs:
If 2.data:types[] = ["Type1", "Type2"]: The function returns ["Type1", "Type2"].
If 2.data:types[] = [] or undefined: The function returns "No Type".
References and Supporting Documentation:
Adobe Workfront Fusion Functions Reference
Workfront Community: Handling Empty Fields with ifempty
A Fusion designer needs to create a Fusion scenario that will assign a user to each task with the Copywriter job role on a project.
Which method results in the fewest number of operations?
Options:
Searching for all assignments in the project where the role is Copywriter and add the user to each assignment
Searching for Tasks in the project with the Copywriter role and assign the user to each task
Using the Misc Action module for the project to assign all Copywriter assignments to the user
Answer:
CExplanation:
Step by Step Comprehensive Detailed Explanation:
Scenario Context:
The goal is to assign a user to all tasks on a project where the role is Copywriter.
The chosen method should minimize the number of operations to ensure efficiency.
Option Analysis:
A. Searching for all assignments in the project where the role is Copywriter and add the user to each assignment:
This approach involves searching assignments, iterating through them, and adding the user individually. Each iteration generates multiple operations, making it less efficient.
B. Searching for Tasks in the project with the Copywriter role and assign the user to each task:
Similar to Option A, this approach also requires iterating through tasks and assigning users one by one, resulting in a higher number of operations.
C. Using the Misc Action module for the project to assign all Copywriter assignments to the user:
Correct. The Misc Action module can perform bulk actions (e.g., assigning users to roles) in a single operation.
This method is the most efficient, as it minimizes the number of operations while achieving the same result.
Why the Misc Action Module is Best:
Efficiency: Bulk operations reduce the number of API calls and iterations.
Performance: Using fewer operations optimizes scenario execution and reduces resource consumption.
Simplicity: Avoids the complexity of iterating through tasks or assignments individually.
Implementation:
Add a Misc Action module to the scenario.
Configure the module to assign the user to all tasks with the Copywriter role on the selected project.
Test the module to ensure it performs the bulk assignment as expected.
What are two required elements of a test case? (Choose two.)
Options:
Expected outcome of test
Name of test owner
Clear procedure for completing the test
Source code being tested
Answer:
A, CExplanation:
A. Expected Outcome of Test
A test case must clearly state what the expected outcome is, providing a standard against which the results can be measured.
This ensures testers can validate whether the scenario behaves as intended.
C. Clear Procedure for Completing the Test
A well-defined procedure outlines the exact steps required to execute the test, ensuring consistent and repeatable testing.
This reduces ambiguity and helps identify whether errors are due to the scenario configuration or improper test execution.
Why Not Other Options?
B. Name of Test Owner: While helpful for accountability, the name of the test owner is not a required component of the test case itself.
D. Source Code Being Tested: Fusion scenarios do not typically involve source code. Instead, the focus is on workflow execution and configuration, making this element irrelevant.
References:
Workfront Training Materials: Test Case Design Best Practices
Adobe Workfront Fusion Documentation: Testing and Debugging Scenarios
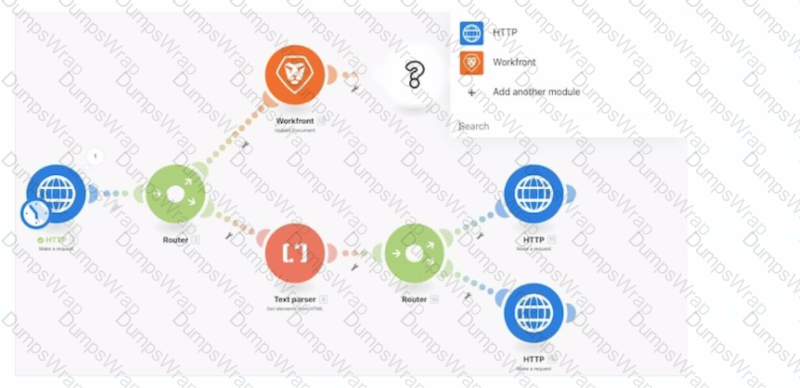
Given this Fusion scenario, a user needs to access multiple fields from the Workfront module for mapped expressions in the HTTP PUT requests.
Which action should the user take?
Options:
Set Multiple Variables module after the Workfront module. Get Multiple Variables between the Text Parser and the bottom Router.
Set Multiple Variables module after the Workfront module. Get Variable modules just before each HTTP module for the specific variables needed in each bottom path.
Set Variable module after the Workfront module. Get Variable modules just before each HTTP module in the bottom paths.
Answer:
AExplanation:
Understanding the Scenario:
The image represents a Workfront Fusion scenario with a Workfront module, HTTP modules, and routers splitting the execution path.
The goal is to reuse multiple fields from the Workfront module (e.g., data extracted or processed earlier in the flow) as mapped expressions in HTTP PUT requests located in the bottom paths.
Why Option A is Correct:
Set Multiple Variables Module: This module allows you to define and store multiple variables at a single point in the scenario (e.g., after the Workfront module). These variables can then be reused throughout subsequent steps in the scenario.
Get Multiple Variables Module: By placing this module between the Text Parser and the bottom Router, you can retrieve all previously stored variables, ensuring consistent access across all branches of the flow. This avoids redundancy and ensures the data is easily accessible for each HTTP request in the bottom paths.
Why the Other Options are Incorrect:
Option B ("Set Multiple Variables after Workfront, Get Variables before each HTTP module"): This is partially correct but less efficient. Adding multiple Get Variable modules before each HTTP request results in repetitive configuration and increases maintenance complexity.
Option C ("Set Variable and Get Variable for each HTTP module"): Using individual Set and Get Variable modules increases duplication. This approach requires separate variables for each data point, which is inefficient compared to using the Set/Get Multiple Variables module for multiple fields at once.
Steps to Configure the Solution:
After the Workfront module:
Add aSet Multiple Variablesmodule.
Define all the fields required for the HTTP PUT requests as variables, mapping them from the Workfront module outputs.
Between the Text Parser and the bottom Router:
Add aGet Multiple Variablesmodule.
Retrieve the previously stored variables, ensuring they are accessible for all paths.
In the HTTP modules on each bottom path:
Use the retrieved variables for mapping in the PUT requests.
How This Solves the Problem:
This approach centralizes variable management, making it easier to access and modify data as needed.
It avoids redundancy, as variables are defined once and reused across all paths, reducing the risk of errors and ensuring consistency.
References and Supporting Documentation:
Adobe Workfront Fusion: Variables Module Overview
Workfront Community: Efficient Use of Variables in Fusion
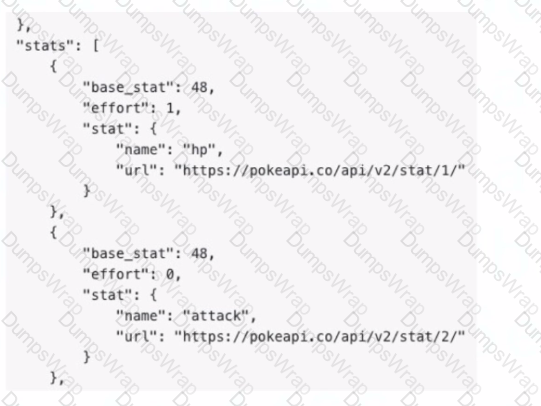
Given the array below, a user wants a comma-separated string of all stat names.
What is the correct expression?
Options:


Answer:
BExplanation:
Understanding the Requirement:
The input is an array containing objects, and the goal is to extract all the stat.name values into acomma-separated string.
Example Input:
[
{
"base_stat": 48,
"effort": 1,
"stat": {
"name": "hp",
"url":
}
},
{
"base_stat": 48,
"effort": 0,
"stat": {
"name": "attack",
"url":
}
}
]
Example Output:"hp, attack"
Why Option B is Correct:
The expressionjoin(map(2.data: stats[]; stats.stat.name); ", "):
map: Iterates through each object in the array (2.data: stats[]) and extracts the stat.name field.
join: Combines the extracted values into a single string, separated by a comma and space (", ").
Breaking it down:
map(2.data: stats[]; stats.stat.name) → Creates an array of names: ["hp", "attack"].
join(...; ", ") → Converts the array into the string "hp, attack".
Why the Other Options are Incorrect:
Option A: join(2.data: stats[]; stat.name; ", ")
This syntax is incorrect because it attempts to directly access stat.name within the join function without first mapping the values.
Option C: join(map(2.data: stats[]; stat.name); ", ")
The mapping references stat.name directly but does not account for the nested structure (stats.stat.name).
Option D: join(flatten(2.data: stats[]); ", ")
The flatten function is unnecessary here as the data is already structured. It would not properly extract the stat.name values.
Steps to Implement in Workfront Fusion:
Add aMapping/Transformation Module.
Use the join(map(...)) function as described to transform the input array into a comma-separated string.
Test the output to ensure it correctly generates the desired format.
How This Solves the Problem:
The map function ensures the proper extraction of nested stat.name values.
The join function combines these values into the desired format efficiently.
References and Supporting Documentation:
Adobe Workfront Fusion Functions Documentation
Workfront Community: Using Map and Join Functions
The combination of map and join ensures that the stat names are extracted and formatted into a single comma-separated string, as required.
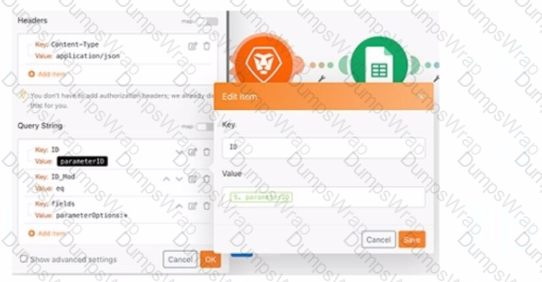
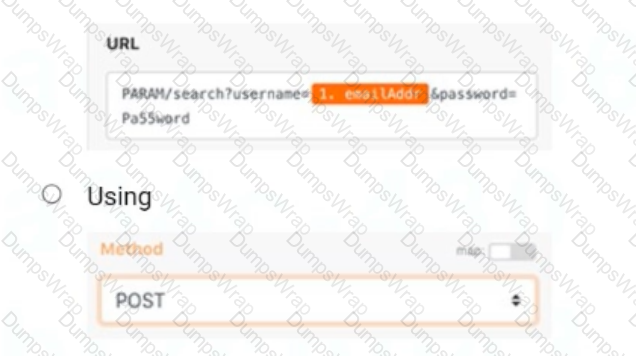
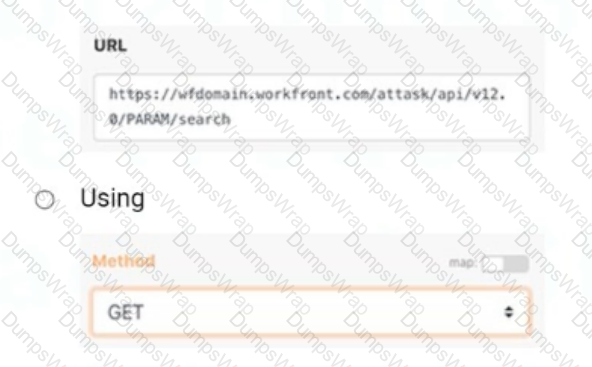
A user needs to find a fields options within a custom form field. The details for the request are shown in the image below:
Which option is applicable for the URL text box?
Options:
 A screenshot of a computer
Description automatically generated
A screenshot of a computer
Description automatically generated
 A screenshot of a web browser
Description automatically generated
A screenshot of a web browser
Description automatically generated
 A screenshot of a web page
Description automatically generated
A screenshot of a web page
Description automatically generated
Answer:
BExplanation:
Step-by-Step Explanation
Purpose of the Query:
The task is to retrievefield optionsfrom acustom form field. This operation involves fetching data, not creating or modifying it, which requires a GET method.
Correct API Structure:
The URL must follow Workfront's API structure:
ruby
Copy
OptionBfollows this standard structure, where:
wfdomain.workfront.com is the placeholder for the Workfront instance.
/attask/api/v12.0 specifies the API version.
/PARAM/search is the endpoint to search for parameters or fields.
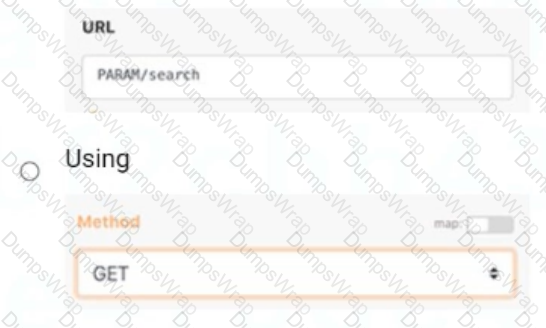
Why Not Other Options?
A: The use of POST is incorrect because it is meant for creating or updating resources, not retrieving data. Additionally, the URL structure is incorrect and includes unnecessary query strings (username, password) not relevant for this operation.
C: While the method GET is correct, the URL (PARAM/search) is incomplete and lacks the required Workfront API structure, making it invalid.
References
Workfront API Documentation: Querying and Retrieving Custom Form Field Data
Experience League Community: Best Practices for Using GET Methods in Workfront API=========================
Which two features or modules can be used to create conditional or nested error handling when using Error Handling Directives? (Choose two.)
Options:
Text Parser
Filters
Workfront app
Routers
Answer:
B, DExplanation:
In Adobe Workfront Fusion, error handling directives are used to manage and respond to errors during scenario execution. These directives allow the implementation of conditional or nested error handling mechanisms, ensuring workflows can adapt and recover from unexpected issues efficiently. Among the features and modules provided by Fusion:
Filters:
Filters are essential components in Workfront Fusion. They allow you to define specific conditions to control the flow of data between modules.
They enable conditional processing by allowing or restricting the passage of data based on defined criteria, which is fundamental for creating dynamic and conditional workflows.
When used with error handling, filters can evaluate whether certain data meets criteria to determine alternative pathways, thus enabling conditional error handling.
Routers:
Routers split the execution of a scenario into multiple branches based on specific conditions.
Each branch can be configured to handle different error types or conditions, allowing nested error handling and custom error recovery paths.
They are particularly useful when you need to define distinct responses for various error cases within a single scenario.
Eliminated Options:
A. Text Parser: While text parsers process and extract data from strings, they are not directly involved in error handling within scenarios.
C. Workfront App: The Workfront app is primarily for interacting with Workfront features and functionalities, not directly related to error handling within Fusion scenarios.
References:
Adobe Workfront Fusion Documentation: Error Handling Directives Overview
Adobe Workfront Community: Filters and Routers in Conditional Logic Workflows
Experience League Documentation:
A Fusion scenario is making too many requests to a third-party API, which returns a 429 "Too Many Requests" error Which technique reduces the number of API requests?
Options:
Using a Search module to get record IDs and then read those IDs with a Read Record module to pull other data
Moving Search and GET modules earlier in the scenario instead of pulling more data about the same record multiple times
Adding a Retry error handling directive to the Fusion scenario
Answer:
BExplanation:
Understanding the Issue:
The scenario is making too many API requests, causing the third-party API to return a429 "Too Many Requests"error, which indicates that the rate limit has been exceeded.
The solution needs to reduce unnecessary or redundant API requests to prevent hitting the API limits.
Why Option B is Correct:
Avoid Redundant Requests:
PlacingSearchandGETmodules earlier in the scenario ensures that all required data is retrieved in one batch or in fewer requests, rather than repeatedly querying the same record later in the scenario.
This technique reduces the overall number of API requests sent to the third-party system.
Efficient Data Flow:
By structuring the scenario to retrieve all necessary data at the beginning, subsequent modules can reuse the retrieved data instead of making additional API calls.
Why the Other Options are Incorrect:
Option A ("Using a Search module and then a Read Record module"):
This approach can increase API requests, as theSearch moduleretrieves record IDs, and theRead Record modulemakes separate API requests for each record. This often results in more requests than necessary.
Option C ("Adding a Retry error handling directive"):
Adding aRetry directivedoes not reduce the number of requests. Instead, it retries failed requests, which could worsen the problem by increasing API traffic.
Best Practices to Reduce API Requests:
Consolidate data retrieval into a single module or a smaller number of requests.
Use caching or intermediate storage (like Fusion Data Stores) to avoid re-fetching the same data.
Limit the scope of Search modules by using filters or pagination to process smaller, relevant data sets.
References and Supporting Documentation:
Adobe Workfront Fusion Best Practices: Managing API Rate Limits
Workfront Community: Error 429 Solutions
To meet compliance standards, a user must include a process that tracks every Workfront project update created by Fusion.
What can they do to address this business requirement?
Options:
Use reporting on the Last Updated by ID and Last Update Date
Update the External Reference ID with User ID and Timestamp
Create a Note record related to the record updated
Answer:
CExplanation:
Step by Step Comprehensive Detailed Explanation:
Problem Summary:
The organization requires a process to track every project update made by Fusion to meet compliance standards.
This process must provide a clear audit trail of updates, including details like user and timestamp.
Option Analysis:
A. Use reporting on the Last Updated by ID and Last Update Date:
While this provides basic reporting, it only reflects the most recent update and does not maintain a comprehensive history of changes over time.
B. Update the External Reference ID with User ID and Timestamp:
Updating the External Reference ID could cause issues if this field is used for other purposes. It is not designed for logging multiple updates.
C. Create a Note record related to the record updated:
Correct. Creating a Note record for each update ensures that every change is logged with relevant details (e.g., user, timestamp, update reason). This approach creates a full audit trail that is easily accessible and reportable.
Why Note Records are Best:
Audit Trail: Notes provide a clear and searchable history of updates for each project.
Compliance: Ensures compliance by documenting who made what changes and when.
Flexibility: Notes can include custom details such as update reasons or additional context, making them more robust than standard fields.
Implementation:
In the Fusion scenario, add a module to create a Note record after each update.
Populate the Note with relevant details, such as:
User ID ({lastUpdatedBy})
Timestamp ({lastUpdateDate})
Description of the change.
Which statement about the differences between instant and polling triggers is true?
Options:
To keep track of records processed, instant triggers store received webhooks in a queue, whereas polling triggers remember which records have already been processed
A user should use instant triggers when available because instant triggers allow Fusion to process bundles of data faster than polling triggers
A user must set up a webhook in Fusion to use Instant Triggers that make polling triggers easier to use and more reliable in scenarios
Only polling triggers can be set to run on a schedule and should be used to avoid shutdown of third-party systems during working hours
Answer:
BExplanation:
Understanding Instant and Polling Triggers:
Instant Triggers:
Rely on webhooks to receive real-time data from a third-party system.
The external system sends a notification (webhook) to Fusion whenever an event occurs, triggering the scenario immediately.
Polling Triggers:
Regularly check (poll) the third-party system for new or updated records at scheduled intervals.
These are slower because they involve repeated API requests.
Why Option B is Correct:
Speed and Efficiency:
Instant triggers process data faster because they act immediately upon receiving a webhook. Polling triggers, on the other hand, may take time depending on the polling frequency and can result in unnecessary delays.
Reduced Load on Systems:
Instant triggers generate fewer API calls than polling triggers, which continuously check for new records even if no changes have occurred.
Best Practice: Use instant triggers whenever supported by the third-party system to ensure faster and more efficient scenario execution.
Why the Other Options are Incorrect:
Option A ("Instant triggers store received webhooks in a queue"):
Webhooks do not store data in a queue; they simply notify Fusion of events in real-time. Polling triggers also do not store records but remember the last processed record.
Option C ("A user must set up a webhook in Fusion"):
Instant triggers require setting up webhooks in the external system, not in Fusion. Fusion provides the webhook endpoint, but the user must configure the source system to send data.
Option D ("Only polling triggers can be set to run on a schedule"):
This is incorrect because instant triggers do not rely on schedules; they operate in real-time. Polling triggers, however, run on schedules and are used when instant triggers are unavailable.
References and Supporting Documentation:
Adobe Workfront Fusion Triggers Documentation
Workfront Community: Differences Between Instant and Polling Triggers
Instant triggers are the preferred option when available, as they provide real-time data processing with greater speed and efficiency than polling triggers.
In this image,
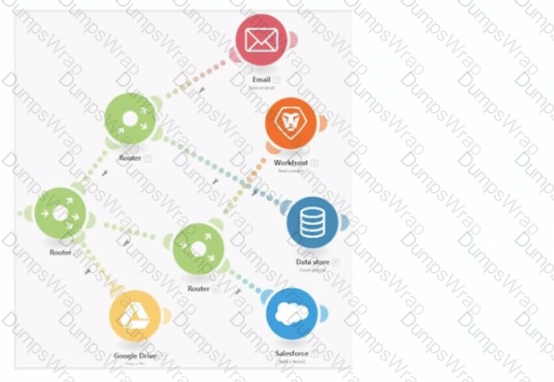
all items are displayed in a position that does not hide their execution sequence. In what order do the modules execute?
Options:
Google Drive > Email > Workfront > Data Store > Salesforce
Email > Workfronl > Data Store > Salesforce > Google Drive
Email > Data Store > Workfront > Salesforce >
Google Drive Google Drive > Email > Data Store > Workfront > Salesforce
Answer:
DExplanation:
Understanding the Diagram:
The image depicts a Workfront Fusion scenario usingRoutersto split and manage multiple execution paths.
Fusion executes modules in aleft-to-rightandtop-to-bottomsequence along each path. Routers direct the flow to downstream modules.
Determining the Execution Sequence:
Path 1:
The first path begins withGoogle Drive. The Router branches out, directing execution sequentially to other modules.
Path 2:
The second path starts withEmailand continues downwards through the remaining modules.
Order Within Branches:
After passing through a Router, each branch completes its sequence of modules before moving to the next Router.
Why Option D is Correct:
Execution begins from the leftmost module (Google Drive) and flows rightward. The sequence is as follows:
Google Drive
Data Store
Workfront
Salesforce
This matches the visual layout and Fusion's execution rules for scenarios with Routers.
Why the Other Options are Incorrect:
Option A ("Google Drive > Email > Workfront > Data Store > Salesforce"):
Incorrect becauseWorkfrontdoes not precedeData Storein the execution order.
Option B ("Email > Workfront > Data Store > Salesforce > Google Drive"):
Incorrect because execution begins withGoogle Drive, not Email.
Option C ("Email > Data Store > Workfront > Salesforce"):
Incorrect because it excludesGoogle Driveas the starting point and places modules out of sequence.
Execution Rules in Workfront Fusion:
Fusion executes modules in the order they appear visually, starting from left to right and top to bottom within each branch.
Routers split the execution into separate branches, which are completed sequentially.
References and Supporting Documentation:
Adobe Workfront Fusion: Execution Flow Rules
Workfront Community: Understanding Router and Module Execution
The correct execution sequence is Google Drive > Email > Data Store > Workfront > Salesforce, ensuring all paths are processed as per the scenario's layout.
A source system should provide a Workfront task ID, but queries keep resulting in an error.
Which module helps determine if the task ID is valid?
Options:
Read Record
Read Related Record
Search Record
Answer:
CExplanation:
To determine if a task ID is valid in Workfront, you can use theSearch Recordmodule. This module allows you to search for records, such as tasks, within Workfront based on a given ID.
Search Record Module:
This module can be used to search for a specific task in Workfront by its task ID.
If the task ID is valid, it will return the task details; if the task ID is invalid, it will return an error or no results.
TheSearch Recordmodule is designed to check if a specific record exists in Workfront, making it ideal for verifying the validity of a task ID.
Why Not Other Options?
A. Read Record: This module reads a specific record by ID but does not search across multiple records. It may not provide the flexibility needed to check if a task ID is valid without knowing the exact task ID.
B. Read Related Record: This module is used to read a related record (e.g., reading the project related to a task). It is not suitable for validating a task ID directly.
References:
Adobe Workfront Fusion Documentation: Search Record Module Usage
Experience League Community: Verifying Record IDs in Workfront Fusion
A Fusion Developer receives frequent notifications that a specific Scenario has been stopped. Upon investigation, the developer notes that there is nothing wrong with the data or process in the scenario, but that the error always occurs on a specific module that calls a third-party system. The error recorded is consistently a service unavailable error, particularly during times of high network traffic to the target system.
Which action should the Fusion Developer take to reduce the number of times the scenario is automatically stopped by Fusion?
Options:
Update the Scenario settings to automatically retry failed executions.
Update the Module settings to automatically ignore failed executions.
Add an error handler to the Module and select a Break directive.
Add an additional route after the failing module with a repeater to retry errors.
Answer:
AExplanation:
In this scenario, the error consistently arises due to the unavailability of a third-party service during high traffic times. This is a temporary issue and does not indicate a problem with the data or process. The recommended approach in such cases is to configure the scenario to retry failed executions:
Update Scenario Settings:
In Workfront Fusion, you can configure scenarios to automatically retry a failed execution.
This option ensures that temporary issues, like service unavailability, are retried after a delay, reducing the chances of the scenario being stopped permanently.
This is particularly useful when dealing with network traffic spikes or third-party API throttling.
Why Not Other Options?
B. Update the Module settings to automatically ignore failed executions: Ignoring failed executions would cause incomplete or incorrect data to flow through the scenario, leading to potential downstream issues.
C. Add an error handler to the Module and select a Break directive: While error handlers are useful, the Break directive stops the scenario from processing further, which is not ideal for a temporary issue.
D. Add an additional route after the failing module with a repeater: Adding a repeater increases complexity and is unnecessary when the retry option is already available in scenario settings.
References:
Adobe Workfront Fusion Documentation: Scenario Settings and Error Handling
Experience League Community: Handling API Rate Limits and Errors in Workfront Fusion
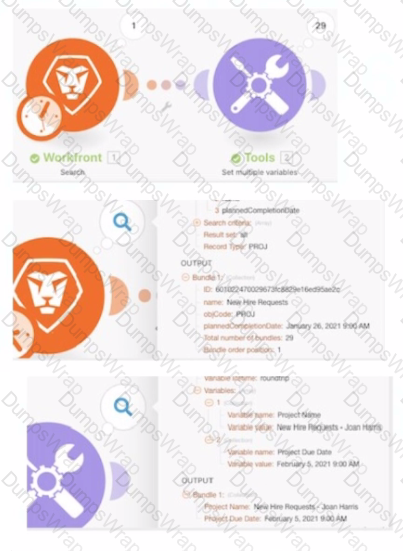
What information can be understood from the images of this bundle inspector?
Options:
The trigger module returned 1 bundle of project data with only the project ID, name, and planned completion date getting passed to the second module in the scenario
The trigger module returned 29 bundles of task data with only the task ID. name, and planned completion date getting passed to the second module in the scenario
The first module delivered 29 bundles of data to the second module. Data manipulations happened in the second module to change the project name and planned completion date
The project name and planned completion date were changed in the trigger module because the input and output fields in the second module are the same
Answer:
CExplanation:
Understanding the Scenario:
The scenario includes two modules:
Workfront Search Module: Fetches data (likely project details).
Tools Module: Manipulates and sets multiple variables.
What the Images Show:
Workfront Search Module (First Module):
The output indicates29 bundlesof project data were retrieved.
Each bundle contains fields such asID,name, andplannedCompletionDate.
Tools Module (Second Module):
The data from the Workfront module is processed to set variables likeProject NameandProject Due Date.
Output includes transformed values, such as appending the approver’s name ("Joan Harris") to the project name and updating the project due date.
Why Option C is Correct:
Delivery of 29 Bundles: The Workfront module retrieved 29 project bundles and passed them to the Tools module.
Data Manipulation in Tools Module: The second module modified the data, such as appending "Joan Harris" to the project name and updating the due date to a different value. This is evident from the changes in the output of the Tools module compared to the input from the Workfront module.
Why the Other Options are Incorrect:
Option A:
Incorrect because theWorkfront moduleretrieved 29 bundles, not just 1 bundle. Additionally, the project name and planned completion date were manipulated in the second module, not the first.
Option B:
Incorrect because the retrieved data pertains to projects, not tasks.
Option D:
Incorrect because theinput and output fields in the Tools moduleare not identical. The data was clearly manipulated within the Tools module.
How This Scenario Operates:
The Workfront module fetches raw data, which is then processed in the Tools module. The processed variables (e.g., modified project names and due dates) are prepared for further use in subsequent scenario steps.
References and Supporting Documentation:
Adobe Workfront Fusion Documentation: Bundle Inspector
Workfront Community: Using Tools Module for Data Manipulation
The correct interpretation is that the first module delivered 29 bundles to the second module, where data manipulations occurred to modify the project name and planned completion date.
