CyberArk Sentry Secrets Manager Questions and Answers
During the configuration of Conjur, what is a possible deployment scenario?
Options:
The Leader and Followers are deployed outside of a Kubernetes environment; Slandbys can run inside a Kubernetes environment.
The Conjur Leader cluster is deployed outside of a Kubernetes environment; Followers can run inside or outside the environment.
The Leader cluster is deployed outside a Kubernetes environment; Followers and Standbys can run inside or outside the environment.
The Conjur Leader cluster and Followers are deployed inside a Kubernetes environment.
Answer:
CExplanation:
Conjur is a secrets management solution that securely stores and manages secrets and credentials used by applications, DevOps tools, and other systems. Conjur can be deployed in different scenarios, depending on the needs and preferences of the organization. One of the possible deployment scenarios is to deploy the Leader cluster outside a Kubernetes environment, and the Followers and Standbys inside or outside the environment.
The Leader cluster is the primary node that handles all write operations and coordinates the replication of data to the Follower and Standby nodes. The Leader cluster consists of one active Leader node and one or more Standby nodes that can be promoted to Leader in case of a failure. The Leader cluster can be deployed outside a Kubernetes environment, such as on a virtual machine or a physical server, using Docker or other installation methods. This can provide more control and flexibility over the configuration and management of the Leader cluster, as well as better performance and security.
The Follower and Standby nodes are read-only replicas of the Leader node that can serve requests from clients and applications that need to retrieve secrets or perform other read-only operations. The Follower and Standby nodes can be deployed inside or outside a Kubernetes environment, depending on the use case and the availability requirements. For example, if the clients and applications are running inside a Kubernetes cluster, it may be convenient and efficient to deploy the Follower and Standby nodes inside the same cluster, using Helm charts or other methods. This can reduce the network latency and complexity, and leverage the Kubernetes features such as service discovery, load balancing, and health checks. Alternatively, if the clients and applications are running outside a Kubernetes cluster, or if there is a need to distribute the Follower and Standby nodes across different regions or availability zones, it may be preferable to deploy the Follower and Standby nodes outside the Kubernetes cluster, using Docker or other methods. This can provide more scalability and resiliency, and avoid the dependency on the Kubernetes cluster.
References = Conjur Deployment Scenarios; Conjur Cluster Installation; Conjur Kubernetes Integration
While installing the first CP in an environment, errors that occurred when the environment was created are displayed; however, the installation procedure continued and finished successfully.
What should you do?
Options:
Continue configuring the application to use the CP. No further action is needed since the successful installation makes the error message benign.
Review the lag file 'CreateEnv.loq' and investigate any error messages it contains.
Run setup.exe again and select 'Recreate Vault Environment'. Provide the details of a user with more privileges when prompted by the installer.
Review the PV WA lags to determine which REST API call used during the installation failed.
Answer:
BExplanation:
B. Review the log file ‘CreateEnv.log’ and investigate any error messages it contains.
This is the best option because the CreateEnv.log file records the steps and results of creating the CP environment in the Vault during the installation. The CP environment includes the safe, the provider user, the application user, and the application identity. If any errors occurred when creating the CP environment, they will be logged in this file and may indicate a problem with the Vault connection, the credential file, the permissions, or the configuration. Reviewing the log file can help to identify and resolve the root cause of the errors and ensure the CP environment is properly set up.
Continuing configuring the application to use the CP without further action is not a good option because it may lead to unexpected or inconsistent behavior of the CP or the application. The errors that occurred when creating the CP environment may affect the security, availability, or integrity of the credentials or the application. Ignoring the errors may also make it harder to troubleshoot or fix them later.
Running setup.exe again and selecting ‘Recreate Vault Environment’ is not a good option because it may overwrite or delete the existing CP environment and cause more errors or conflicts. Recreating the Vault environment should only be done after reviewing the log file and understanding the cause of the errors. Moreover, recreating the Vault environment may require more privileges than creating it for the first time, as some objects may be already in use or locked.
Reviewing the PVWA logs to determine which REST API call used during the installation failed is not a good option because it may not provide enough information or context to understand or resolve the errors. The PVWA logs may show the HTTP status codes or messages of the REST API calls, but they may not show the details or parameters of the calls or the responses. The PVWA logs may also contain other unrelated or irrelevant entries that may confuse or distract from the errors. The CreateEnv.log file is a more specific and reliable source of information for the errors that occurred when creating the CP environment.
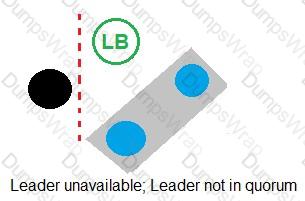
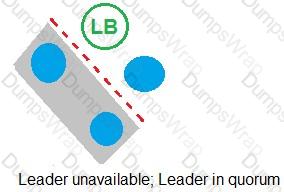
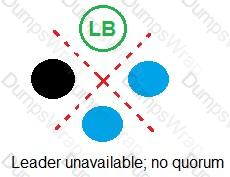
Refer to the exhibit.
In which example will auto-failover occur?

A)
B)

C)
D)
Options:
Option A
Option B
Option C
Option D
Answer:
CExplanation:
According to the CyberArk Sentry Secrets Manager documentation, auto-failover is a feature that enables the automatic promotion of a standby node to a leader node in case of a leader failure. Auto-failover requires a quorum, which is a majority of nodes in the cluster that are available and synchronized. A quorum ensures that only one node can be promoted to a leader at a time and prevents split-brain scenarios. In the exhibit, each option shows a network diagram of a load balancer and four nodes, one of which is crossed out with a red X, indicating a leader failure. The text below each diagram indicates whether there is a quorum or not. Option C is the only example where auto-failover will occur, because there is a quorum of three out of four nodes, and one of the standby nodes can be promoted to a leader. Option A will not have auto-failover, because there is no quorum, as only two out of four nodes are available. Option B will not have auto-failover, because there is no quorum, as only one out of four nodes is available. Option D will not have auto-failover, because there is no quorum, as none of the nodes are available. References: 1: Auto-failover 2: Configure auto-failover
A customer requires high availability in its AWS cloud infrastructure.
What is the minimally viable Conjur deployment architecture to achieve this?
Options:
one Follower in each AZ. load balancer for the region
two Followers in each region, load balanced for the region
two Followers in each AZ. load balanced for the region
two Followers in each region, load balanced across all regions
Answer:
AExplanation:
According to the CyberArk Sentry Secrets Manager documentation, Conjur is a secrets management solution that consists of a leader node and one or more follower nodes. The leader node is responsible for managing the secrets, policies, and audit records, while the follower nodes are read-only replicas that can serve secrets requests from applications. To achieve high availability in AWS cloud infrastructure, the minimally viable Conjur deployment architecture is to have one follower in each availability zone (AZ) and a load balancer for the region. This way, if one AZ fails, the applications can still access secrets from another AZ through the load balancer. Having two followers in each region, load balanced for the region, is not enough to ensure high availability, as a regional outage can affect both followers. Having two followers in each AZ, load balanced for the region, is more than necessary, as one follower per AZ can handle the secrets requests. Having two followers in each region, load balanced across all regions, is not feasible, as Conjur does not support cross-region replication. References: 1: Conjur Architecture 2: Deploying Conjur on AWS
When attempting to retrieve a credential, you receive an error 401 – Malformed Authorization Token.
What is the cause of the issue?
Options:
The token is not correctly encoded.
The token you are trying to retrieve does not exist.
The host does not have access to the credential with the current token.
The credential has not been initialized.
Answer:
AExplanation:
= The cause of the issue is that the token is not correctly encoded. A token is a string of characters that represents a credential or an authorization grant for accessing a resource. A token must be encoded according to a specific format and standard, such as Base64, JSON Web Token (JWT), or OAuth 2.0. If the token is malformed, meaning that it does not follow the expected format or standard, the server will reject the token and return an error 401 - Malformed Authorization Token. This error indicates that the token is invalid or expired, and the request is unauthorized. To resolve the issue, the token must be regenerated or refreshed using the correct encoding method and parameters12. References: =
- CyberArk Identity: Getting 401 unauthorized Error when using API calls with OAuth2 Client 2, Resolution 1
- Troubleshoot CyberArk Vault Synchronizer 1, Error: Forbidden Logon Token is Empty - Cannot logon Unauthorized
Arrange the manual failover configuration steps in the correct sequence.

Options:
Answer:

Explanation:

In the event of a Leader failure, you can perform a manual failover to promote one of the Standbys to be the new Leader. The manual failover process consists of the following steps:
- Suspend replication for all Standbys and Followers and identify the best failover candidate. This step ensures that no data is lost or corrupted during the failover process. The best failover candidate is the Standby with the most advanced replication timeline, which means it has the most up-to-date data from the Leader.
- Promote the failover candidate to be the new Leader. This step changes the role of the failover candidate from a Standby to a Leader, and updates its configuration accordingly. The new Leader can now accept write requests from clients and replicate data to other nodes.
- Restore replication. This step re-establishes the replication connections between the new Leader and the other nodes, and rebases the replication of the other Standbys and Followers to the new Leader. This ensures that all nodes have the same data and are in sync with the new Leader.
References: The manual failover configuration steps are explained in detail in the Configure Manual Failover section of the CyberArk Conjur Enterprise documentation. The image in the question is taken from the same source.
Arrange the steps to configure authenticators in the correct the sequence.

Options:
Answer:

Explanation:

- Create an authenticator policy for each authenticator and then load the policy to Conjur.
- Add each authenticator to conjur.yml using this format:
. - Execute evoke configuration apply.
Comprehensive Explanation: Authenticators are plugins that enable Conjur to authenticate requests from different types of clients, such as Kubernetes, Azure, or LDAP. To configure authenticators, you need to follow these steps:
- Create an authenticator policy for each authenticator and then load the policy to Conjur. This step defines the authenticator as a resource in Conjur and grants permissions to the users or hosts that can use it. You can use the policy templates provided by Conjur for each authenticator type, or create your own custom policy. For more information, see Define Authenticator Policy.
- Add each authenticator to conjur.yml using this format:
. This step enables the authenticator service on the Conjur server and specifies the service ID that identifies the authenticator instance. The service ID must match the one used in the policy. For more information, see Enable Authenticators. - Execute evoke configuration apply. This step applies the changes made to the conjur.yml file and restarts the Conjur service. This is necessary for the authenticator configuration to take effect. For more information, see Apply Configuration Changes.
References: The steps to configure authenticators are explained in detail in the Configure Authenticators section of the CyberArk Conjur Enterprise documentation. The image in the question is taken from the same source.
When installing the Vault Conjur Synchronizer, you see this error:
Forbidden
Logon Token is Empty – Cannot logon
Unauthorized
What must you ensure to remediate the issue?
Options:
This admin user must not be logged in to other sessions during the Vault Conjur Synchronizer installation process.
You specified the correct url for Conjur and it is listed as a SAN on that url’s certificate.
You correctly URI encoded the url in the installation script.
You ran powershell as Administrator and there is sufficient space on the server on which you are running the installation.
Answer:
AExplanation:
= This error occurs when the Vault Conjur Synchronizer installation script tries to log in to the Vault using the admin user credentials, but the admin user is already logged in to other sessions. The Vault has a limit on the number of concurrent sessions per user, and the default value is one. Therefore, the installation script fails to authenticate the admin user and returns the error message: Forbidden Logon Token is Empty - Cannot logon Unauthorized. To remediate the issue, the admin user must log out of any other sessions before running the installation script, or increase the limit on the number of concurrent sessions per user in the Vault configuration file12. References: =
- Troubleshoot CyberArk Vault Synchronizer 1, Error: Forbidden Logon Token is Empty - Cannot logon Unauthorized
- Vault.ini File Parameters 2, ConcurrentSessionsPerUser
When attempting to configure a Follower, you receive the error:

Which port is the problem?
Options:
5432
1999
443
1858
Answer:
AExplanation:
The error message “psql: server closed the connection unexpectedly” means that the server terminated abnormally before or while processing the request. This is likely due to the Leader Load Balancer not being available on the port and replication cannot be established. The port that is the problem is 5432, which is the default port for PostgreSQL database connections. The Follower needs to connect to the Leader Load Balancer on this port to receive the replication data from the Leader. If the port is blocked or unreachable, the Follower will fail to sync with the Leader and display the error message. References: [Set up Follower], [Troubleshoot Follower]
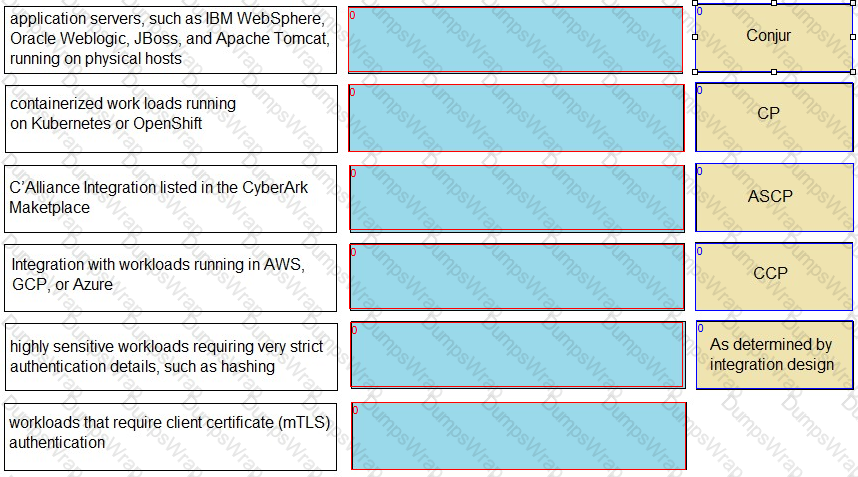
Match each use case to the appropriate Secrets Manager Solution.
Options:
Answer:

Where can all the self-signed/imported certificates be found in Conjur?
Options:
/opt/conjur/etc/ssl from the Conjur containers
/opt/conjur/certificates from the Conjur containers
/opt/cyberark/dap/certs from the Conjur containers
Log in to the Conjur UI > Conjur Cluster > Certificates > view.
Answer:
AExplanation:
Conjur uses TLS certificates for authentication between nodes and clients. These certificates are either self-signed by Conjur or imported from a third-party CA. All the certificates are stored in the /opt/conjur/etc/ssl directory from the Conjur containers. This directory contains the following files:
- ca.crt: The CA certificate used to verify all Conjur node certificates. This is either the self-signed Conjur CA certificate or the imported third-party CA certificate.
- server.crt: The server certificate used by the Conjur node for HTTPS and mTLS connections. This certificate contains the DNS names of the node and the load balancer in the CN and SAN fields.
- server.key: The private key corresponding to the server certificate.
- cert.pem: A symbolic link to the server certificate file.
- key.pem: A symbolic link to the server key file.
References: Certificate architecture, Certificate requirements, Rotate certificates
Learn more:
Match each scenario to the appropriate Secrets Manager solution.
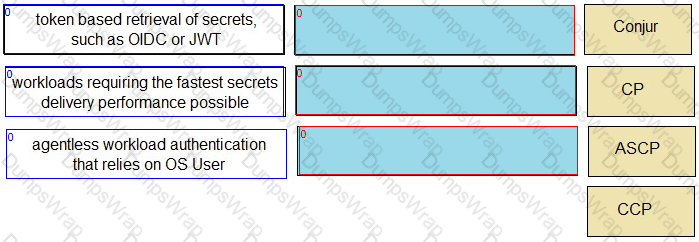
Options:
Answer:

Explanation:
The appropriate Secrets Manager solution for each scenario is as follows:
- token based retrieval of secrets, such as OIDC or JWT: Conjur
- workloads requiring the fastest secrets delivery performance possible: ASCP
- agentless workload authentication that relies on OS User: CCP
These solutions are described in the Secrets Management Tools page of the CyberArk website
Which statement is true for the Conjur Command Line Interface (CLI)?
Options:
It is supported on Windows, Red Hat Enterprise Linux, and macOS.
It can only be run from the Conjur Leader node.
It is required for working with the Conjur REST API.
It does not implement the Conjur REST API for managing Conjur resources.
Answer:
AExplanation:
This is the correct answer because the Conjur CLI is a tool that allows users to interact with the Conjur REST API from the command line. The Conjur CLI can be run on Windows, Red Hat Enterprise Linux, and macOS operating systems, as well as in Docker containers. The Conjur CLI can be installed using various methods, such as downloading the executable file, using a package manager, or pulling the Docker image. The Conjur CLI supports Conjur Enterprise 12.9 or later versions. This answer is based on the CyberArk Secrets Manager documentation1 and the CyberArk Secrets Manager training course2.
The other options are not true statements for the Conjur CLI. The Conjur CLI can be run from any machine that has network access to the Conjur server, not only from the Conjur Leader node. The Conjur Leader node is the node that performs read/write operations on the Conjur database and policy engine, and hosts the Conjur UI and API endpoints. The Conjur CLI is not required for working with the Conjur REST API, as users can also use other tools, such as curl, Postman, or web browsers, to send HTTP requests to the Conjur REST API. The Conjur CLI does implement the Conjur REST API for managing Conjur resources, such as roles, policies, secrets, and audit records. The Conjur CLI provides a set of commands that correspond to the Conjur REST API endpoints and allow users to perform various operations on the Conjur resources.
You are setting up a Kubernetes integration with Conjur. With performance as the key deciding factor, namespace and service account will be used as identity characteristics.
Which authentication method should you choose?
Options:
JWT-based authentication
Certificate-based authentication
API key authentication
Connect (OIDC) authentication
Answer:
AExplanation:
According to the CyberArk Sentry Secrets Manager documentation, JWT-based authentication is the recommended method for authenticating Kubernetes pods with Conjur. JWT-based authentication uses JSON Web Tokens (JWTs) that are issued by the Kubernetes API server and signed by its private key. The JWTs contain the pod’s namespace and service account as identity characteristics, which are verified by Conjur against a policy that defines the allowed namespaces and service accounts. JWT-based authentication is fast, scalable, and secure, as it does not require any additional certificates, secrets, or sidecars to be deployed on the pods. JWT-based authentication also supports rotation and revocation of the Kubernetes API server’s private key, which enhances the security and resilience of the authentication process.
Certificate-based authentication is another method for authenticating Kubernetes pods with Conjur, but it is not the best option for performance. Certificate-based authentication uses X.509 certificates that are generated by a Conjur CA service and injected into the pods as Kubernetes secrets. The certificates contain the pod’s namespace and service account as identity characteristics, which are verified by Conjur against a policy that defines the allowed namespaces and service accounts. Certificate-based authentication is secure and reliable, but it requires more resources and steps to generate, inject, and manage the certificates and secrets. Certificate-based authentication also does not support rotation and revocation of the certificates, which may pose a security risk if the certificates are compromised or expired.
API key authentication and Connect (OIDC) authentication are not valid methods for authenticating Kubernetes pods with Conjur. API key authentication is used for authenticating hosts, users, and applications that have a Conjur identity and an API key. Connect (OIDC) authentication is used for authenticating users and applications that have an OpenID Connect identity and a token. These methods are not suitable for Kubernetes pods, as they do not use the pod’s namespace and service account as identity characteristics, and they require additional secrets or tokens to be stored and managed on the pods. References: = JWT Authenticator | CyberArk Docs; Certificate Authenticator | CyberArk Docs; API Key Authenticator | CyberArk Docs; Connect Authenticator | CyberArk Docs
You are setting up the Secrets Provider for Kubernetes to support rotation with Push-to-File mode.
Which deployment option should be used?
Options:
Init container
Application container
Sidecar
Service Broker
Answer:
CExplanation:
According to the CyberArk Sentry Secrets Manager documentation, the Secrets Provider for Kubernetes can be deployed as an init container or a sidecar in Push-to-File mode. In Push-to-File mode, the Secrets Provider pushes Conjur secrets to one or more secrets files in a shared volume in the same Pod as the application container. The application container can then consume the secrets files from the shared volume. The deployment option that should be used to support rotation with Push-to-File mode is the sidecar, because the sidecar can run continuously and check for updates to the secrets in Conjur. If changes are detected, the sidecar can update the secrets files in the shared volume. The init container, on the other hand, runs to completion and does not support rotation. The application container and the service broker are not valid deployment options for the Secrets Provider for Kubernetes in Push-to-File mode. References: 1: Secrets Provider - Init container/Sidecar - Push-to-File mode 2: Secrets Provider - init container/sidecar - Push-to-File mode
Match each cloud platform to the correct Conjur authenticator.
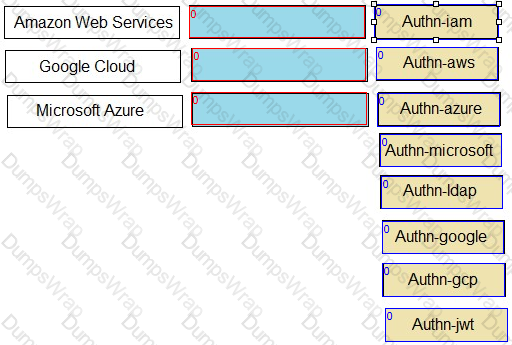
Options:
Answer:

Explanation:
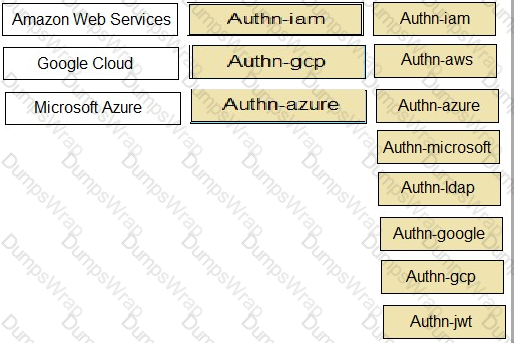
- AWS -> authn-iam
- Azure -> authn-azure
- GCP -> authn-gcp
- JWT Provider -> authn-jwt
Explanation: Conjur supports different authenticators for different cloud platforms. Each authenticator allows a resource or service running on the cloud platform to authenticate to Conjur using a unique identity token signed by the cloud provider. The following are the descriptions of each authenticator:
- authn-iam: Enables an AWS resource to use its AWS IAM role to authenticate with Conjur. The resource sends a request to the AWS Security Token Service (STS) to get a signed AWS access token, and then sends the token to Conjur for verification.
- authn-azure: Enables an Azure resource to authenticate with Conjur. The resource sends a request to the Azure Instance Metadata Service (IMDS) to get a signed Azure access token, and then sends the token to Conjur for verification.
- authn-gcp: Enables a Google Cloud Platform resource to authenticate with Conjur. The resource sends a request to the Google Cloud Identity and Access Management (IAM) service to get a signed Google identity token, and then sends the token to Conjur for verification.
- authn-jwt: Enables an application to authenticate to Conjur using a JWT from a JWT Provider. The application obtains a JWT from the JWT Provider, and then sends the JWT to Conjur for verification.
References: You can find more information about the Conjur authenticators in the following resources:
- Supported Conjur Cloud authenticators
- Configure Conjur Cloud authenticators
- GCP Authenticator
A Kubernetes application attempting to authenticate to the Follower load balancer receives this error:
ERROR: 2024/10/30 06:07:08 authenticator.go:139: CAKC029E Received invalid response to certificate signing request. Reason: status code 401
When checking the logs, you see this message:
authn-k8s/prd-cluster-01 is not enabled
How do you remediate the issue?
Options:
Check the info endpoint on each Follower behind the load balancer and enable the authenticator on the Follower.
Modify conjur.conf in /opt/conjur/etc/authenticators addinqthe authenticator webservice.
A network issue is preventing the application from reaching the Follower; correct the issue and verity that it is resolved.
Enable the authenticator in the Ul > Webservices > Authenticators > Enable and enable the appropriate authenticator webservice.
Answer:
BExplanation:
The error message indicates that the authenticator webservice is not enabled on the Conjur server. To enable the authenticator, you need to modify the conjur.conf file in the /opt/conjur/etc directory and add the authenticator webservice ID to the CONJUR_AUTHENTICATORS environment variable. For example, if the authenticator webservice ID is authn-k8s/prd-cluster-01, you need to add it to the existing value of CONJUR_AUTHENTICATORS, separated by a comma. Then, you need to restart the Conjur service for the changes to take effect. This will enable the authenticator on the Conjur server and allow the Kubernetes application to authenticate to the Follower load balancer. References: Enable the Authenticator Webservice, Configure the Authenticator Webservice
You are enabling synchronous replication on Conjur cluster.
What should you do?
Options:
Execute this command on the Leader:
docker exec
evoke replication sync that
*
Execute this command on each Standby:
docker exec
evoke replication sync that
*
In Conjur web UI, click the Tools icon in the top right corner of the main window.
Choose Conjur Cluster and click “Enable synchronous replication” in the entry for Leader.
In Conjur web UI, click the Tools icon in the top right corner of the main window.
Choose Conjur Cluster and click “Enable synchronous replication” in the entry for Standbys.
Answer:
AExplanation:
o enable synchronous replication on a Conjur cluster, you need to run the command evoke replication sync that on the Leader node of the cluster. This command will configure the Leader to wait for confirmation from all Standbys before committing any transaction to the database. This ensures that the data is consistent across all nodes and prevents data loss in case of a failover. However, this also increases the latency and reduces the throughput of the cluster, so it should be used with caution and only when required by the business or compliance needs.
References:
- Conjur Cluster Replication
- Sentry - Secrets Manager - Sample Items & Study Guide

