Red Hat Certified Engineer (RHCE) exam for Red Hat Enterprise Linux 8 Questions and Answers
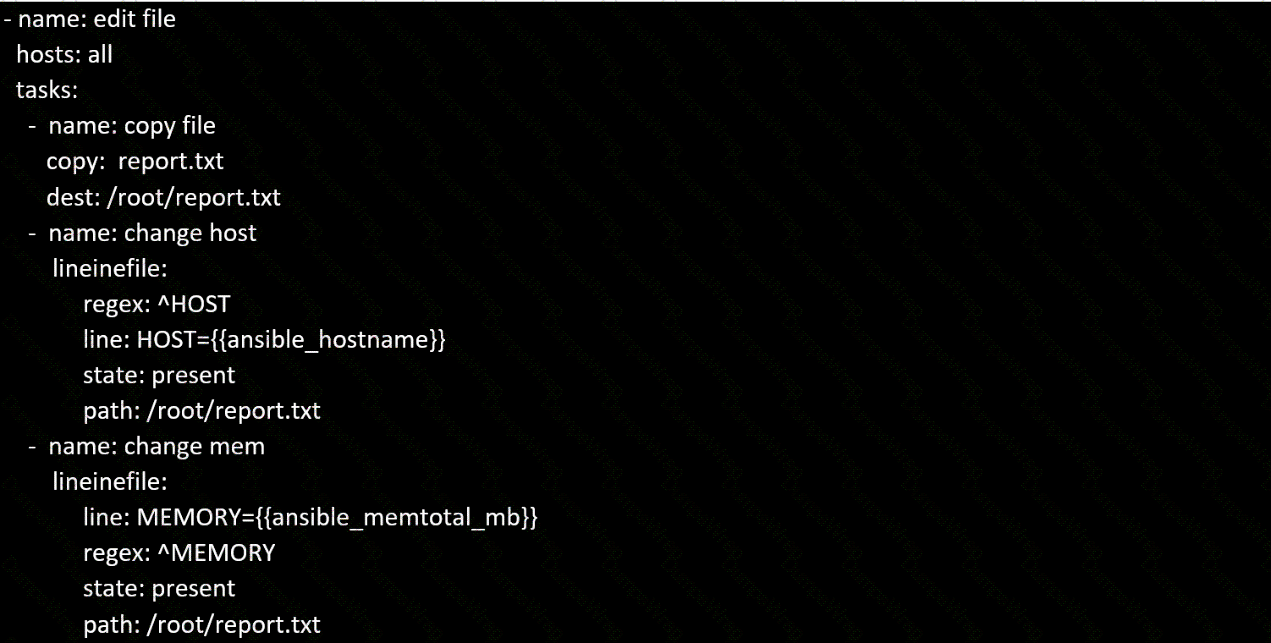
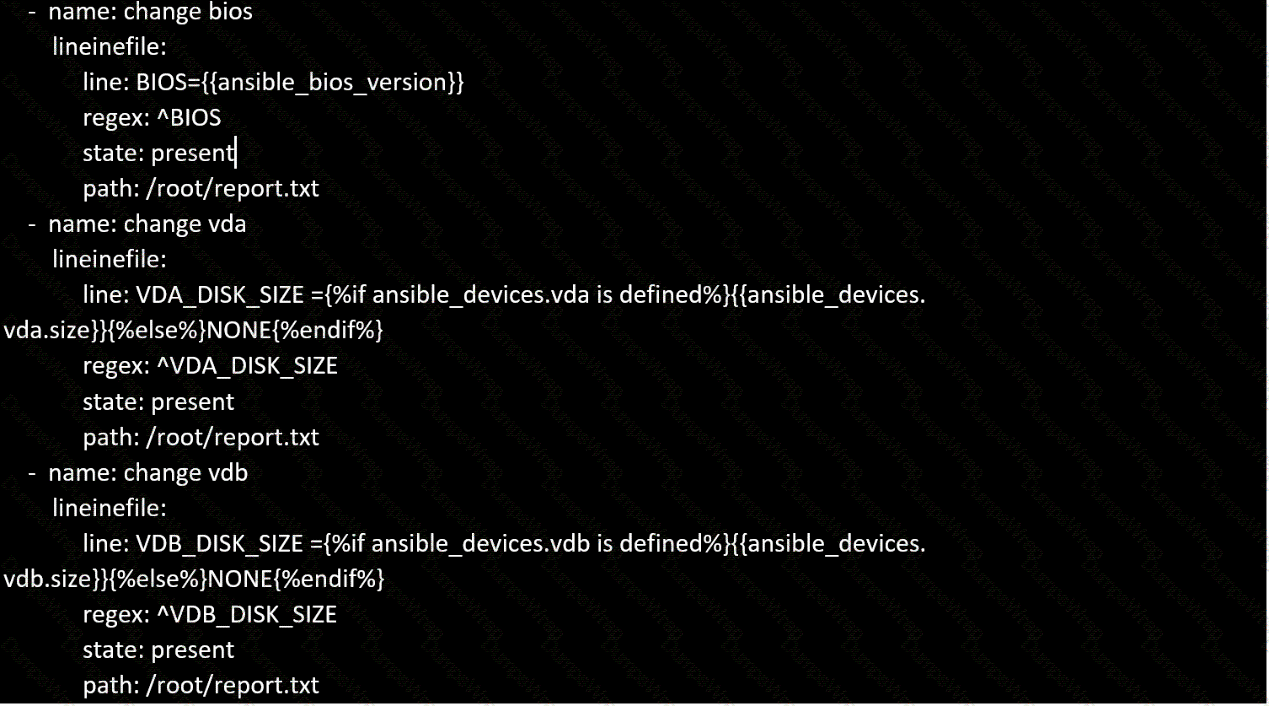
Create a file called specs.empty in home/bob/ansible on the local machine as follows:
HOST=
MEMORY=
BIOS=
VDA_DISK_SIZE=
VDB_DISK_SIZE=
Create the playbook /home/bob/ansible/specs.yml which copies specs.empty to all remote nodes' path /root/specs.txt. Using the specs.yml playbook then edit specs.txt on the remote machines to reflect the appropriate ansible facts.
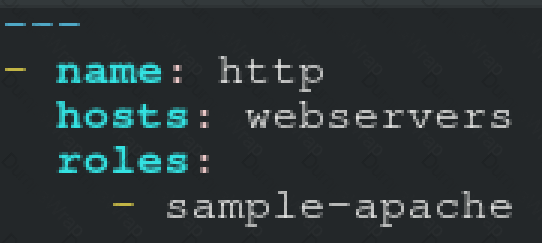
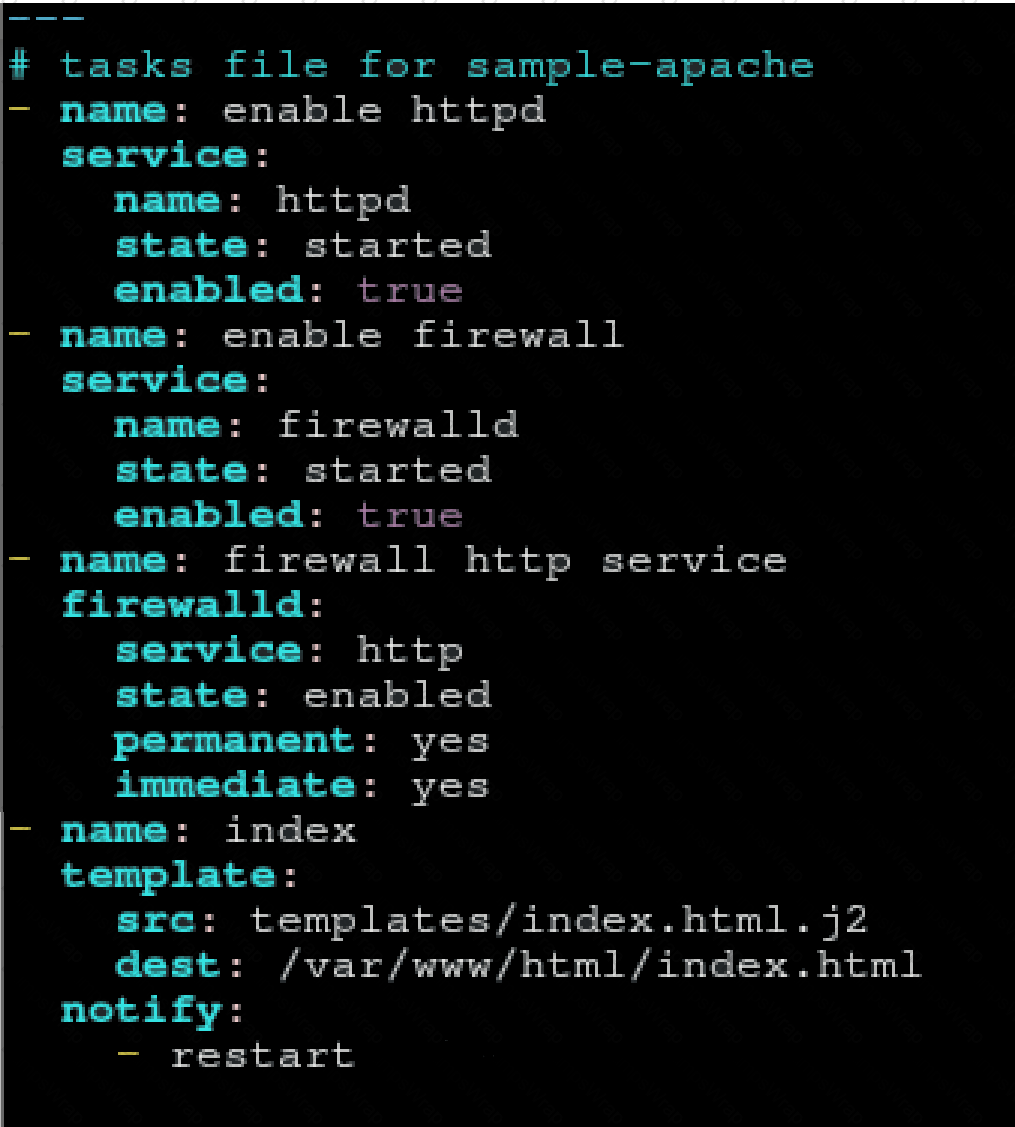
Create a role called sample-apache in /home/sandy/ansible/roles that enables and starts httpd, enables and starts the firewall and allows the webserver service. Create a template called index.html.j2 which creates and serves a message from /var/www/html/index.html Whenever the content of the file changes, restart the webserver service.
Welcome to [FQDN] on [IP]
Replace the FQDN with the fully qualified domain name and IP with the ip address of the node using ansible facts. Lastly, create a playbook in /home/sandy/ansible/ called apache.yml and use the role to serve the index file on webserver hosts.
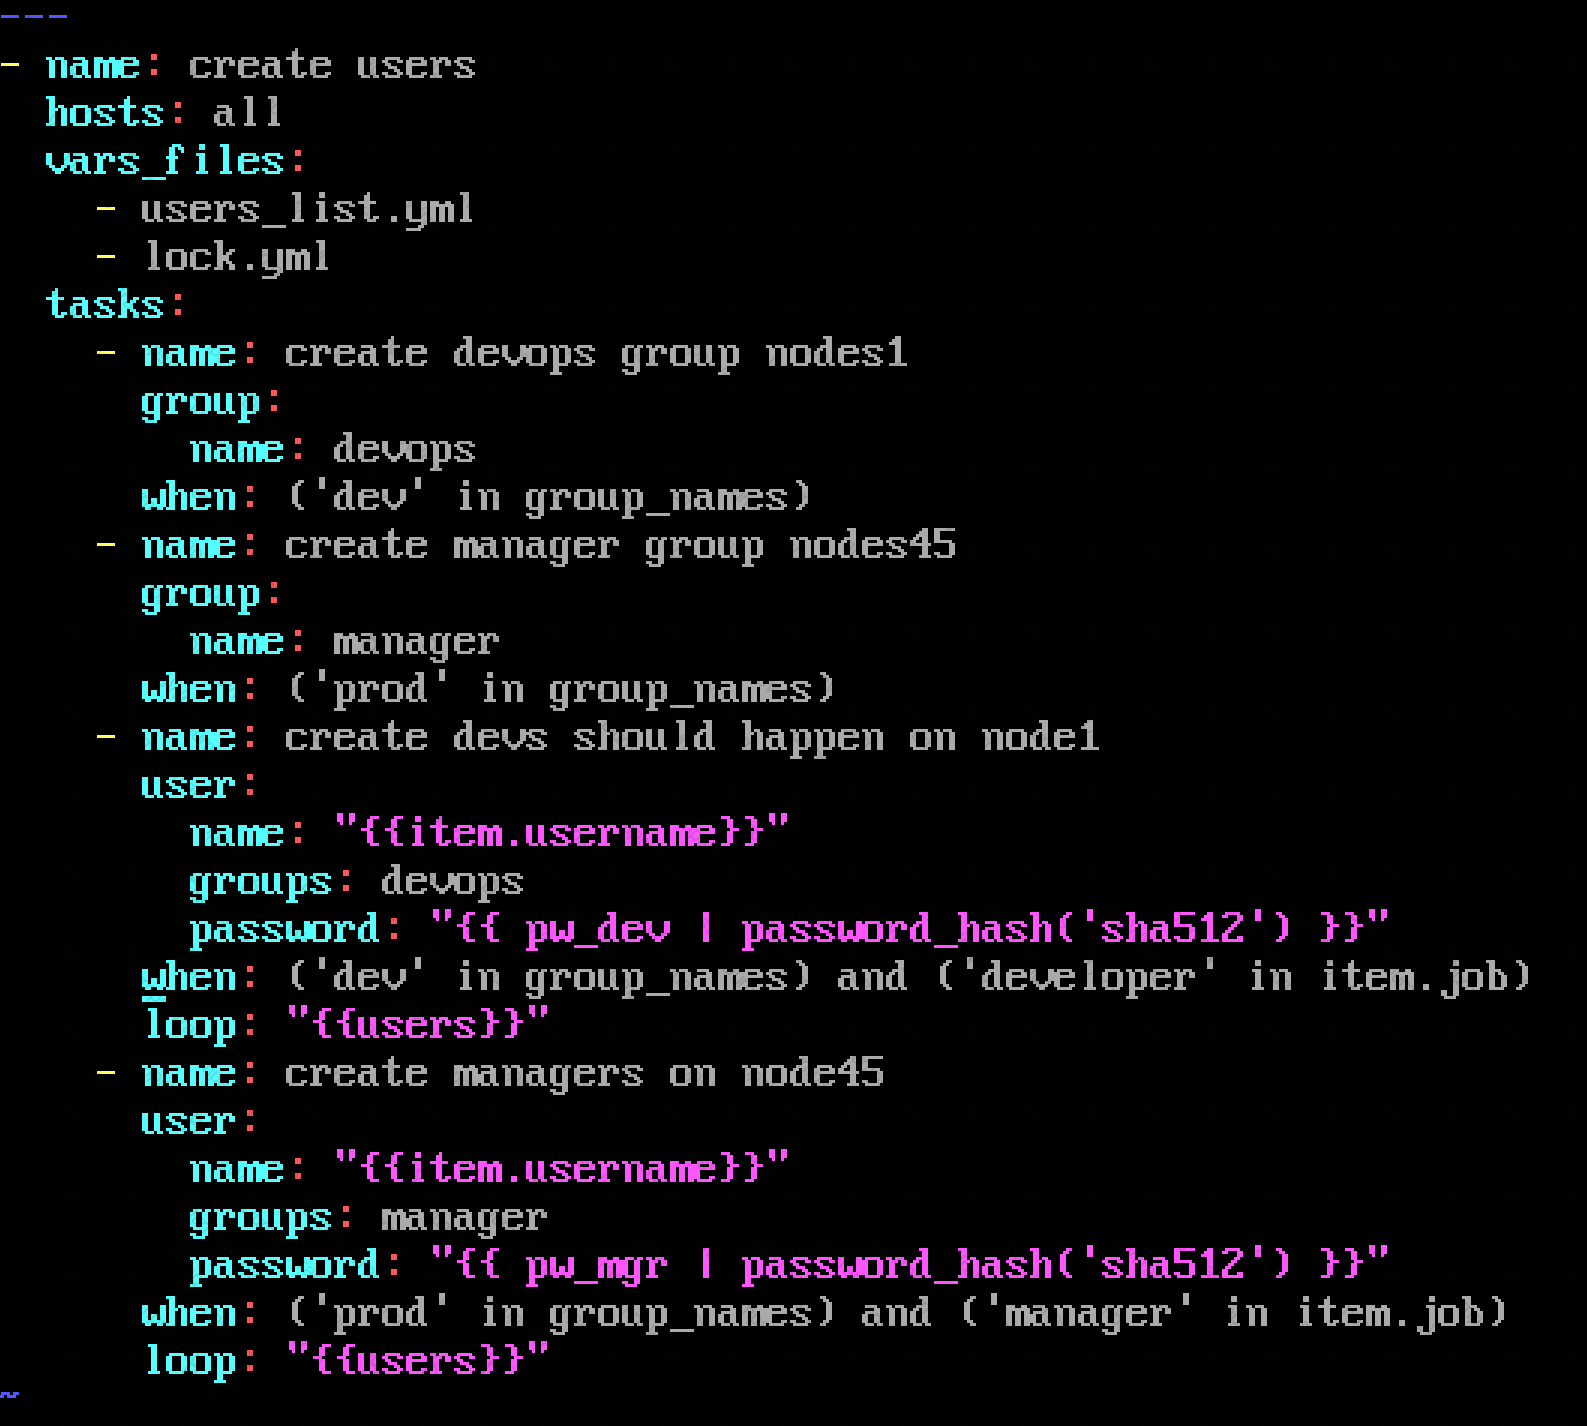
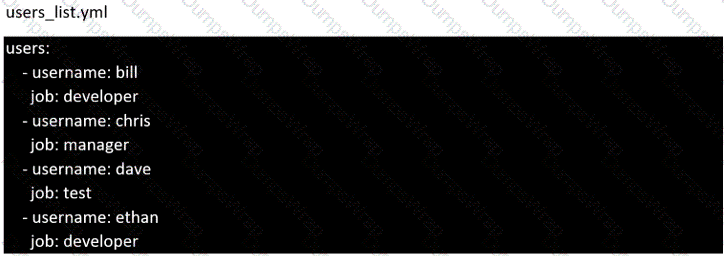
Create the users in the file usersjist.yml file provided. Do this in a playbook called users.yml located at /home/sandy/ansible. The passwords for these users should be set using the lock.yml file from TASK7. When running the playbook, the lock.yml file should be unlocked with secret.txt file from TASK 7.
All users with the job of 'developer' should be created on the dev hosts, add them to the group devops, their password should be set using the pw_dev variable. Likewise create users with the job of 'manager' on the proxy host and add the users to the group 'managers', their password should be set using the pw_mgr variable.
Create an empty encrypted file called myvault.yml in /home/sandy/ansible and set the password to notsafepw. Rekey the password to iwejfj2221.
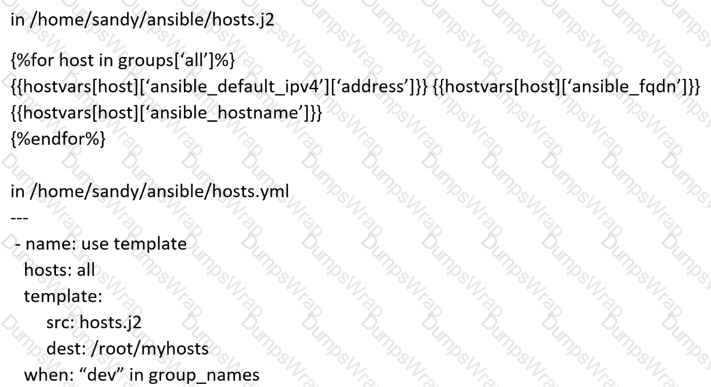
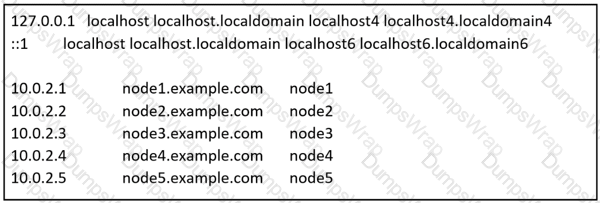
Create a jinja template in /home/sandy/ansible/ and name it hosts.j2. Edit this file so it looks like the one below. The order of the nodes doesn't matter. Then create a playbook in /home/sandy/ansible called hosts.yml and install the template on dev node at /root/myhosts
Create user accounts
------------------------
--> A list of users to be created can be found in the file called user_list.yml
which you should download from and
save to /home/admin/ansible/
--> Using the password vault created elsewhere in this exam, create a playbook called
create_user.yml
that creates user accounts as follows:
--> Users with a job description of developer should be:
--> created on managed nodes in the "dev" and "test" host groups assigned the
password from the "dev_pass"
variable and these user should be member of supplementary group "devops".
--> Users with a job description of manager should be:
--> created on managed nodes in the "prod" host group assigned the password from
the "mgr_pass" variable
and these user should be member of supplementary group "opsmgr"
--> Passwords should use the "SHA512" hash format. Your playbook should work using
the vault password file
created elsewhere in this exam.
while practising you to create these file hear. But in exam have to download as per
questation.
user_list.yml file consist:
---
user:
- name: user1
job: developer
- name: user2
job: manager
Create a playbook called web.yml as follows:
* The playbook runs on managed nodes in the "dev" host group
* Create the directory /webdev with the following requirements:
--> membership in the apache group
--> regular permissions: owner=r+w+execute, group=r+w+execute, other=r+execute
s.p=set group-id
* Symbolically link /var/www/html/webdev to /webdev
* Create the file /webdev/index.html with a single line of text that reads:
“Development”
--> it should be available on
Create a playbook called balance.yml as follows:
* The playbook contains a play that runs on hosts in balancers host group and uses
the balancer role.
--> This role configures a service to loadbalance webserver requests between hosts
in the webservers host group.curl
--> When implemented, browsing to hosts in the balancers host group (for example
should produce the following output:
Welcome to node3.example.com on 192.168.10.z
--> Reloading the browser should return output from the alternate web server:
Welcome to node4.example.com on 192.168.10.a
* The playbook contains a play that runs on hosts in webservers host group and uses
the phphello role.
--> When implemented, browsing to hosts in the webservers host group with the URL /
hello.php should produce the following output:
Hello PHP World from FQDN
--> where FQDN is the fully qualified domain name of the host. For example,
browsing to should produce the following output:
Hello PHP World from node3.example.com
* Similarly, browsing to should produce the
following output:
Hello PHP World from node4.example.com
Create and run an Ansible ad-hoc command.
--> As a system administrator, you will need to install software on the managed
nodes.
--> Create a shell script called yum-pack.sh that runs an Ansible ad-hoc command to
create yum-repository on each of the managed nodes as follows:
--> repository1
-----------
1. The name of the repository is EX407
2. The description is "Ex407 Description"
3. The base URL is
4. GPG signature checking is enabled
5. The GPG key URL is
release
6. The repository is enabled
--> repository2
-----------
1. The name of the repository is EXX407
2. The description is "Exx407 Description"
3. The base URL is
4. GPG signature checking is enabled
5. The GPG key URL is RPM-GPG-KEYredhat-
release
6. The repository is enabled
Modify file content.
------------------------
Create a playbook called /home/admin/ansible/modify.yml as follows:
* The playbook runs on all inventory hosts
* The playbook replaces the contents of /etc/issue with a single line of text as
follows:
--> On hosts in the dev host group, the line reads: “Development”
--> On hosts in the test host group, the line reads: “Test”
--> On hosts in the prod host group, the line reads: “Production”

